Every website needs to be cleaned up from time to time, as it may contain inactive plugins, old backups, unnecessary code, and a bunch of other junk that prevents the site from functioning properly. The size of the website does not matter—even a small blog about conservation can slow down due to storing unnecessary images and updates that no one has checked in a long time.
So, if your website has started to perform poorly and you don’t know how to fix it, this article will help. Here we have provided step-by-step instructions on what to check to keep your WordPress website stable and user-friendly.
Maintenance mode
Before we begin, we would like to clarify one important thing. When performing certain tasks on a WordPress site, you may need to use maintenance mode. This is a special placeholder with text that informs users that the site is temporarily unavailable. It prevents users from accessing the site but allows administrators to continue working.
This is a useful feature because when installing a new plugin, updating a theme, or optimizing code, the site may not display correctly. The maintenance page protects visitors from negative experiences and allows you to safely perform all updates. This way, you not only protect the site from possible crashes, but also improve the user experience.
1. Clear the cache on the website side
The cache consists of website files (images, style sheets, scripts, etc.) that are stored in temporary memory and speed up the reloading of pages. Sometimes outdated or damaged cache remains in storage, which degrades page display, causes errors, and incorrect content updates. Therefore, the cache must be cleared periodically to keep the site running smoothly.
Through caching plugins
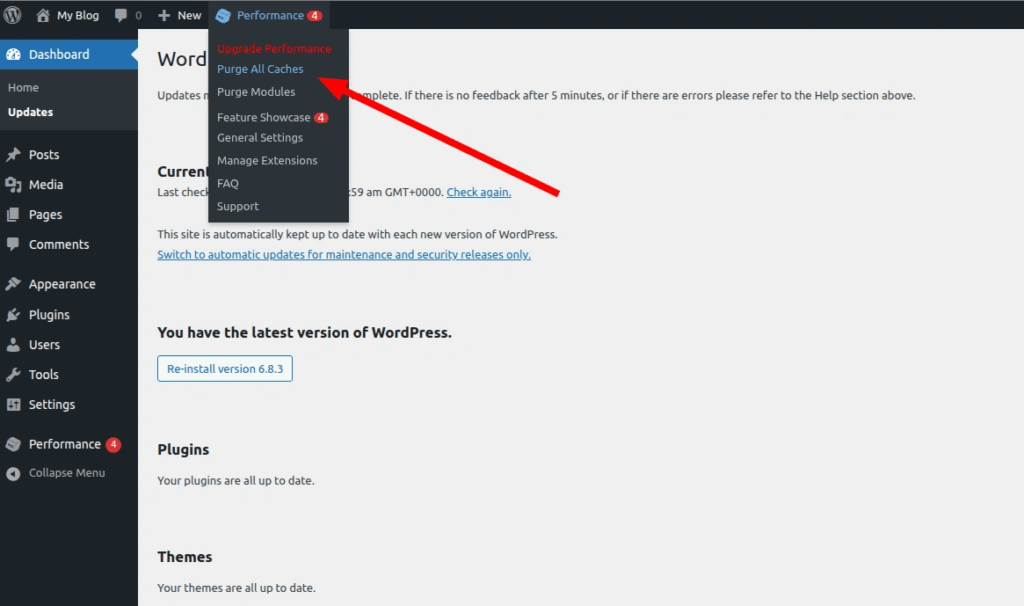
First, you need to have a caching plugin installed, in our example – W3 Total Cache. In the top panel of the WP admin, find the “Performance” section and click “Purge All Caches”.
First, you need to have a caching plugin installed, in our example – W3 Total Cache. In the top panel of the WP admin panel, find the “Performance” section and click “Purge All Caches.”
Plugins may refer to this button differently, for example, “Clear Cache” or “Purge All” as in LiteSpeed Cache. By the way, here are instructions for setting up LiteSpeed Cache for WordPress.
Through the WP admin panel
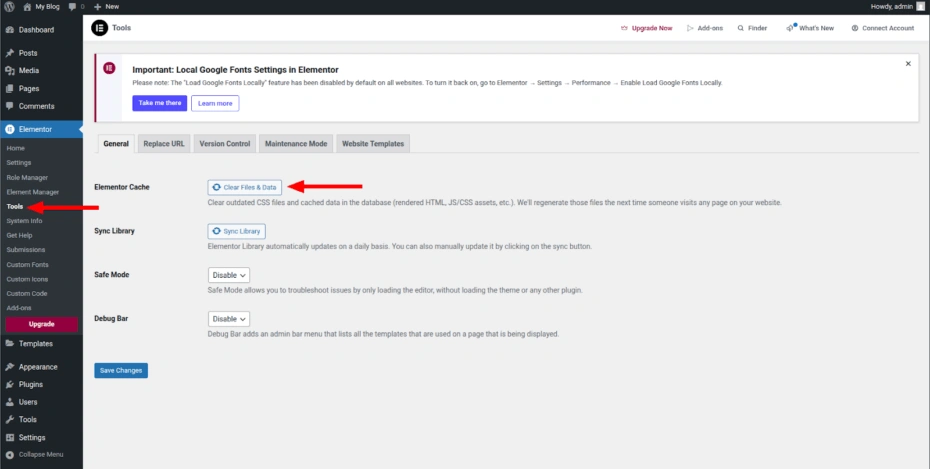
Let’s show you an example using the Elementor builder. Although, by analogy, you can clear the cache of the theme, block editor (Gutenberg), fonts, etc.
In the left menu of the admin panel, find the “Elementor” section and click “Tools.” A page with Elementor builder settings will open. In the ‘General’ tab, find the “Elementor Cache” section and click “Clear Files & Data.”
Through hosting on a LiteSpeed web server
If LiteSpeed web server is installed on the server, a special cache clearing function is added to the hosting control panel (in our example, cPanel). You can find it in the “Advanced” section under the name “LiteSpeed Web Cache Manager”.

Via hosting on the Nginx web server
Similarly, if your hosting runs on the Nginx web server, the cache clearing function is available directly in the cPanel panel—on the right side of the screen, in the General Information tab. To clear the cache, simply click the Clear Cache button in the NGINX Caching section.

2. Clearing the object cache
The object cache is a mechanism that stores the results of database queries in the PHP memory while the page is being executed. It allows you to quickly retrieve data from the database instead of re-executing queries. This cache is temporary and disappears after the page is reloaded.
To keep this cache permanently, connect an external persistent cache, such as Redis or Memcached. They store data in the server’s RAM between requests. This significantly speeds up the site, as data access becomes much faster. However, if you use old cached data, there may be delays in executing requests.
That is why the object cache also needs to be cleared periodically, which can be done in a special command line – WP-CLI. This is a program that allows you to perform various administrative tasks directly through the terminal. WP-CLI is easy to install — here is a link to the instructions. Anyone can get it, but first you need to contact technical support and get SSH access.
Enter the command wp cache flush in the WP-CLI command line—it will flush the cached data that WP stores using the wp_cache_set() function. This is the cache in memory at the time of the request, but if you have Redis or Memcached connected, the command will clear them as well.
It is important to note that object caching is not supported on shared hosting. This mechanism only works on VPS and dedicated servers, where it can be very useful.
3. Clean up the database
The database needs to be kept clean, because even there, unnecessary data can accumulate. For example, the wp_options table may store settings for plugins that you deleted long ago and no longer use. Imagine how much data can accumulate over years of changing plugins and content — and this can certainly affect the performance of your site.
Some plugins clean up after themselves when deleted, but most leave data behind and steal your megabytes.
A database is a serious thing, so before you delete or change anything in it, you need to understand exactly what you are doing. Even experienced specialists make backup copies before editing records, just in case. This allows you to quickly restore your site in case of an error or data corruption.
A simpler option for cleaning up the database is to use a plugin, such as Optimize Database after Deleting Revisions, which will remove unnecessary records and, at the same time, remove old revisions of blog posts. In principle, after cleaning, the plugin can be removed.
To prevent hundreds of revisions from accumulating again, add define( “WP_POST_REVISIONS”, 3 ); to the wp-config.php configuration file under the line /* Add any custom values between this line and the “stop editing” line. */.
4. Check WordPress system notifications
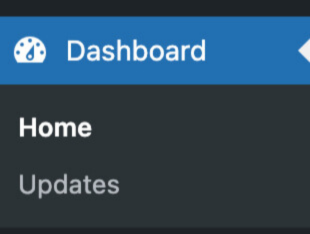
WordPress immediately notifies you of necessary updates or recommendations for improving the performance of your site — just like a dashboard in a car. If you need to update a plugin, theme, or WordPress itself, a red circle with the number of necessary updates will appear on the “Home” → “Updates” tab. But it is worth checking for updates manually as well.
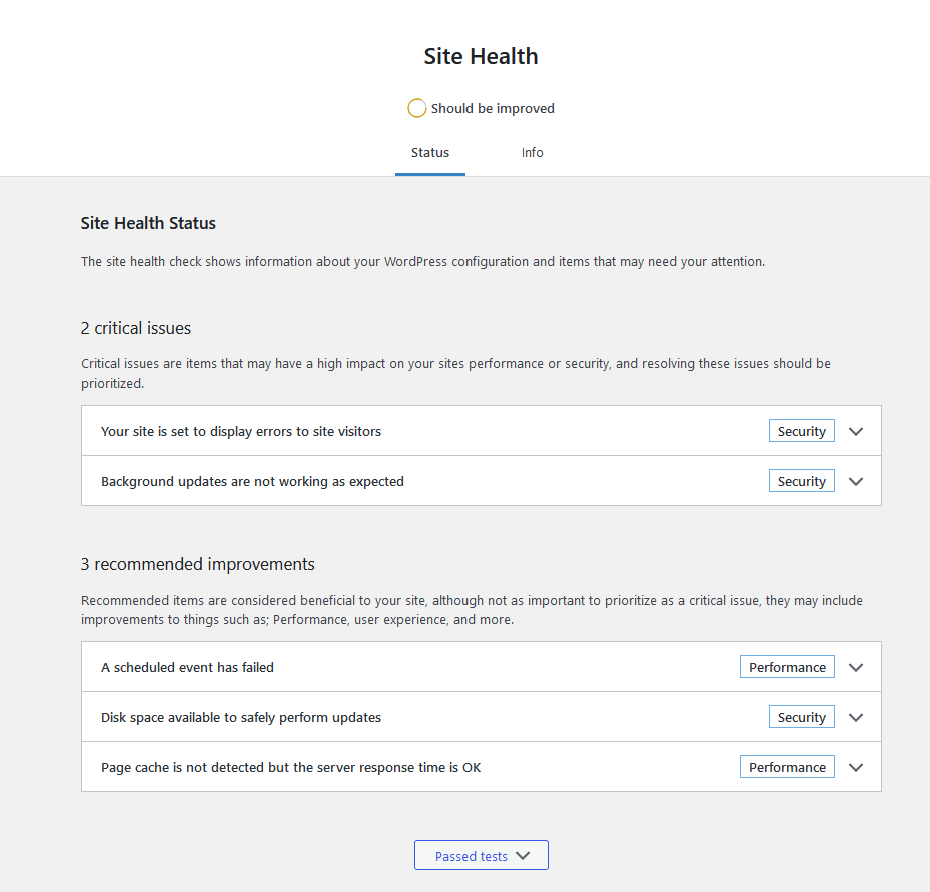
WordPress also has a feature for assessing the overall health of your site. You can find it on the Tools → Site Health tab.
The Status tab displays both critical errors and simple recommendations that can improve site performance and security. There is also an Information tab, which contains a lot of technical data about the site, such as the PHP version, database name, download directory size, etc.
5. Delete unused media files
Old images, GIFs, and videos from deleted posts and pages can be deleted manually, down to the green brooms. This is especially true if your site is many years old and you could fill an entire gallery with all the unnecessary media files.
However, it is more effective to use a special plugin, such as Media Cleaner or any other that will automatically move such media files to a temporary trash folder. There you can confirm each deletion.
It is also worth checking whether your site contains any damaged images. They may appear after migrating to another domain, changing the theme, or simply due to incorrect file uploads. In addition to their unsightly appearance, this also negatively affects SEO, because search engines perceive such errors as technical ones. The same Media Cleaner will help with this.
6. Update WordPress, active themes, and plugins
Make sure WordPress is up to date, as older versions reduce website performance. In addition, they are a major source of vulnerabilities, so we definitely don’t skip this step. It is advisable to install new versions every time, and WordPress constantly reminds you of this in the admin panel.
As of October 2025, the current version of WordPress is 6.8.3, which can be installed in just a few clicks. To do this, click “Please update now” on the admin panel’s main page.

Update WordPress via its main page.
In the updates window, click “Update to version 6.8.3.”

Checking the WordPress version in the “Updates” section.
That’s it, the update will download automatically. At this time, the site will go into maintenance mode, which lasts from a few seconds to a few minutes.

Installing the new version of WordPress.
But be careful! Before updating, make sure you have recent backups and check the compatibility of your plugins with the new version of WordPress (you can find compatibility information in the “Updates” section or on the plugin page). Only then should you update.
As for themes and plugins, the principle is the same—update regularly and carefully.
The theme affects the appearance of pages and the stability of the site, so update it as soon as you receive a notification about the release of a new version. But be careful: if you have previously modified the theme yourself, all manual edits will be deleted after the update. In this case, it is better to create a child theme and only then update it.
It is also worth keeping plugin versions up to date, as they can become a vulnerability for your site. To do this, open the “Plugins” → “Installed” section and update them — all at once or selectively, depending on your needs. After updating, check that the site is working correctly and make sure that the update has not caused any conflicts between plugins/themes.
By the way, after updating, it is advisable to clear all caches again.
7. Optimize images
Unoptimized media files can slow down a website just as much as overloading it with plugins or themes. They affect not only the user experience but also SEO, because page loading speed is taken into account when ranking.
Website builders and CDNs usually have an automatic image optimization feature. For example, Cloudflare offers this feature on its Pro plan. Here is an article that explains the difference between the free and paid versions of Cloudflare in more detail. You can also enable lazy loading to speed up your website even more.
The easiest way to optimize manually is to use a modern image format. For example, .webp, which has the same quality as .jpg but weighs half as much. There are several ways to do this:
Through plugins. You can use Modern Image Formats or similar plugins. These plugins compress images without losing quality, optimize existing files in the database, and convert them to WebP and AVIF formats.
Manually before uploading. You can change the format in a special image converter, such as Squoosh. It is free and works as a plugin – it reduces the size without losing quality. But this way you will only change the format of new images, while the old ones will remain in their formats and continue to be displayed at the old URLs. To update them, you need to reload the files with the same name (to preserve links and indexing).
After changing the format or size, it is worth regenerating the thumbnails. This can be done using the Regenerate Thumbnails plugin or via WP-CLI with the wp media regenerate command.
8. Put user accounts in order
Over time, many accounts accumulate in the site admin panel—authors, editors, administrators, etc. This information needs to be updated periodically, and old accounts need to be deleted. To do this, go to the “Users” → “All Users” section and see who is there and whether each of them has the correct level of permissions to work.
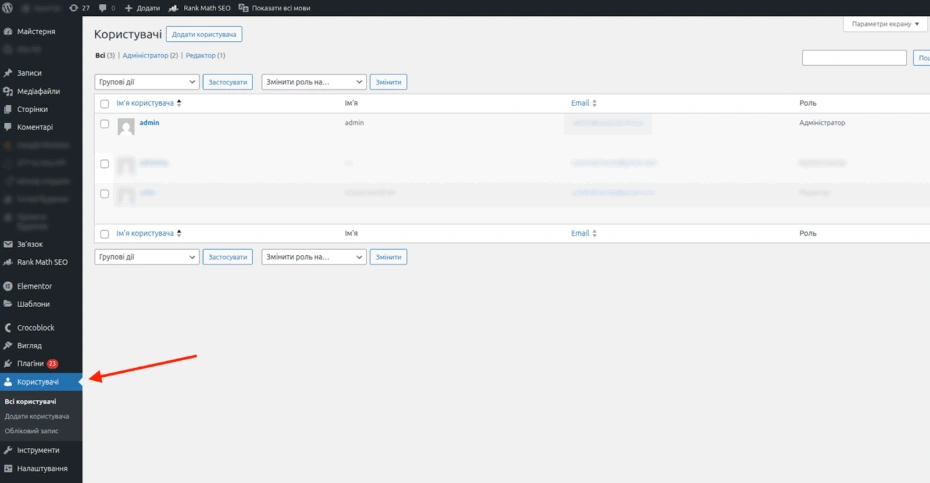
If there is a suspicious account among the users—for example, you did not create it, or the email address looks strange—just delete it. It could be a test account or the result of a hack, so it is not worth keeping it in the admin panel.
Additionally, you can enable two-factor authentication to protect access to the admin panel. To do this, use the Wordfence Security plugin. With it, when logging into the admin panel, users must not only enter a password, but also a one-time code from their mobile phone. This plugin also has a useful login restriction feature that blocks IP addresses after several failed login attempts.
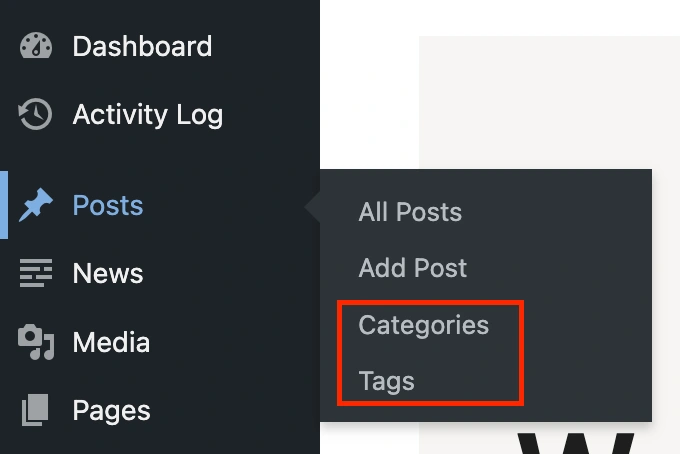
9. Remove unnecessary categories and tags for blog posts
Categories and tags improve search engine optimization and user experience. But if your blog has duplicate categories, and some of them are empty, it not only worsens the structure of your site and SEO, but also clutters up your WordPress.
In the “Post” section, go to the “Categories” and “Tags” tabs. Check for duplicates, similar names, or empty sections. For example, if there are ‘SEO’ and “search engine optimization,” reassign all posts to one of them and delete the other (this can be done by simply hovering the cursor over them). You can also merge similar categories and tags to reduce their number, simplify navigation, and improve the blog structure.
If there are a lot of categories and tags, you can automate the check using plugins such as TaxoPress.
After cleaning up, it is worth updating the internal links in your posts to preserve their weight. For example, if you deleted the “Marketing” category but previously left a link to it in an article, it will now lead users to a 404 page, which should be avoided.
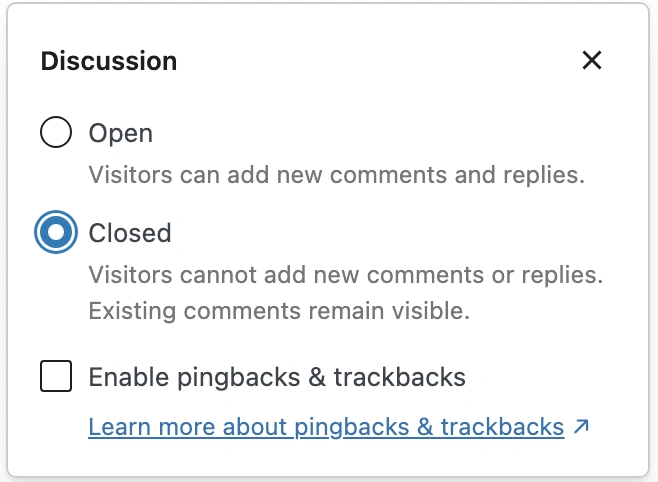
10. Delete spam comments
If your blog allows comments, then spam has a chance to get in. Usually, plugins such as Akismet are installed right away, which move suspicious comments to a separate “Spam” folder, from where you can safely delete them.
Or you can eliminate the problem at its root and completely disable the ability to leave comments. To do this, when editing a post, go to the “Discussion” menu and select “Closed.”
You can also protect your forms on the website, as spam from there can consume a lot of hosting resources. reCAPTCHA, Cloudflare, WP anti-spam plugins, hidden fields in forms, anti-spam services, etc. can help with this. For more information on how to protect forms from spam, see our previous article.
11. Fix broken links
Broken links take users to pages that don’t exist. This negatively affects not only the user experience but also SEO, as such links dilute the weight of the page on which they are located. Therefore, it is important that they are not present on your website at all.
You can find broken links manually, but if the website is several years old and contains many pages, it will be difficult to check every link. Fortunately, this process can be automated using:
- Google Search Console;
- special services such as Ahrefs or Sitechecker;
- WordPress plugins such as Broken Link Checker.
Once broken links have been found, you can proceed to fix them. Depending on the reason why the link is broken, update it, delete it, or set up a 301 redirect.
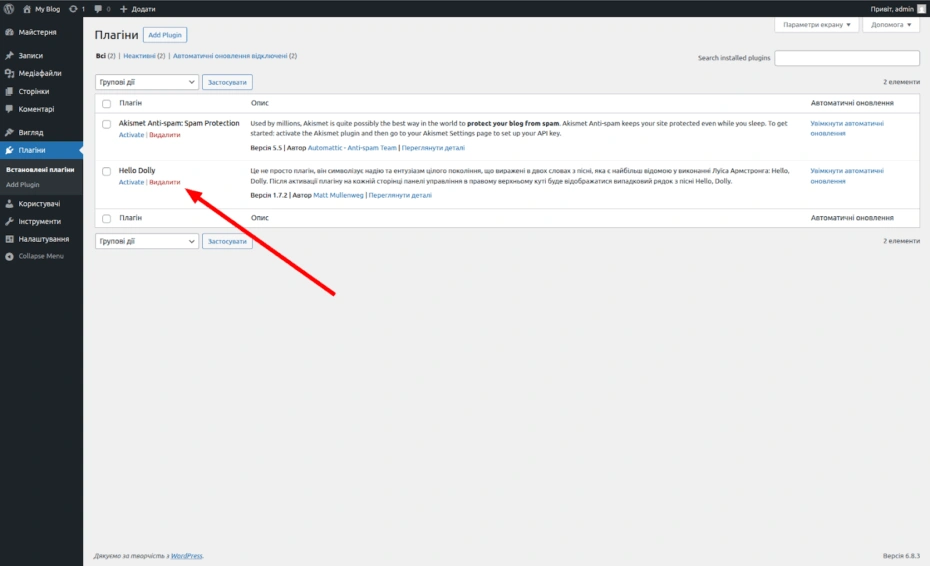
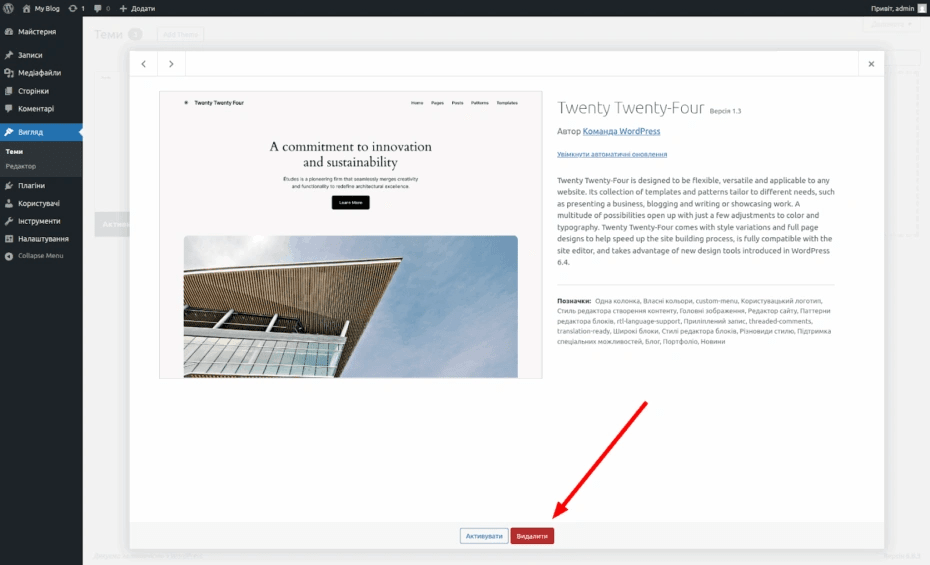
12. Remove unnecessary themes and plugins
If you no longer use a plugin, you should delete it rather than simply deactivating it. This is because accumulating plugins overloads WordPress, creates security vulnerabilities, and can cause conflicts between them.
To delete a plugin, go to Plugins → Installed Plugins, find the one you don’t need, and click Delete.
Themes should be deleted for the same reasons. WP recommends keeping one custom theme and one standard theme to avoid a white screen if your theme breaks. You can delete a theme via the Appearance → Themes → Theme Details tab, and then click Delete at the bottom.
Finally
How often you maintain your WordPress site depends on your needs and the type of work you do. For example, it is worth checking for plugin and theme updates weekly, but database optimization should be done quarterly. However, the most important thing is regular maintenance, because without it, your site will run slowly, rank lower, and may even crash over time.
After cleaning, we recommend checking the site in PageSpeed Insights —the loading speed should increase. Also, review the server logs to make sure there are no new errors.