If you’ve been looking for a comprehensive step-by-step guide on how to create a website on WordPress, congratulations – you’ve found us. We’re happy to help you take the first step toward your perfect new website.
Why do people like WordPress so much?
WordPress is a content management system (CMS) that includes a plugin architecture and a template system. That’s why you can customize any website to suit your online business, blog, or portfolio
WordPress is love because:
- you don’t have to pay for layout and design;
- you don’t need to be a “mom’s hacker” — the interface is completely intuitive;
- you can manage the site from any computer — just log in to your browser and that’s it. Plus, several people with access can do it at once;
- it will be easier to get to the top of search results – because the WordPress code is clean and simple, search engines can easily read and index the site’s content;
- The blog is already built-in and ready to go – you can set up subscriptions and comments on it. This usually increases brand reach.
- The site is under your complete control (to be honest, this is both a plus and a minus). On the one hand, you don’t have to wait for someone to make certain updates and worry about their quality, but on the other hand, there is no one to shift the responsibility to if something goes wrong.
- The site can easily scale as your business grows — even 1,000 pages will not affect performance if optimized correctly.
How to create a WordPress website on your own?
This guide contains seven articles that describe the step-by-step process of creating your own WordPress website. As a bonus, at the end of the guide, we provide several tips that are beneficial to know before you begin working with WordPress.
Step 1. Order a domain and hosting
In order for users to be able to access your website 24/7, its files must be stored on a server. This is what it means to host a website. The best solution for a small WordPress website is specialized WordPress hosting.
On normal servers/hosts, the dynamics will quickly display pages, resulting in a lower bounce rate and better authority in search engines. Without this important element, it is quite difficult to get to the top of the search results.
And the issue of uptime (the time during which the site operates without interruption) is resolved automatically. If the host has not overloaded the server and is not trying to save money by placing all the sites in the world on it, then your resource will most likely not crash. Of course, no one is completely immune to problems at the data center. But even in such cases, a reputable host will quickly fix the situation.
It’s a little easier with a domain name — you name the site, choose the zone in which you want to register the domain, for example, .COM, .ORG, or a thematic one, for example, .SHOP, and register it.
Step 2. Install WordPress
Before you start installing the software, make sure your website meets the requirements set by WordPress itself:
- PHP version 7.4 or higher
- MySQL version 5.7 or higher OR MariaDB version 10.3 or higher
- HTTPS protocol
Installing WordPress is free and can be done in three ways:
- Manually via WordPress.org – the most common method
- Auto-installation in your HostPro personal account
- With Softaculous in the cPanel control panel
Step 3. Install an SSL certificate
If you plan to sell anything on your website, sooner or later you will need to install an SSL certificate . Why is it necessary?
- Your users’ data (including payment details) will be transmitted in encrypted form, and it will be impossible to intercept it “along the way.”
- Users will not see the “unsecured connection” warning, and a lock icon will be displayed in the address bar. By clicking on it, visitors will see a notification about a secure connection.
- There is a belief that Google ranks websites with SSL higher.
- WordPress itself requires the HTTPS protocol for installation.
Step 4. Select and configure a theme
After installing WordPress, you will have access to the standard Twenty Twenty-Two theme. However, this template usually does not have enough functionality, and you will need to install another one.
You can view the theme catalog on the official WordPress.org website. Here you can choose both free and paid themes, with specific themes or universal ones.
Step 5. Add pages and start a blog
It is through the pages of your website that you can tell people about yourself and sell your product (whether it’s an online store or a blog). The main thing is to create pages wisely, and then it’s just a matter of constantly adding and updating content.
To achieve success, we need not only pages, but also blog posts. Why blog at all, and how critical is it?
- A blog in native format also sells.
- If you fill it with truly useful content (expert reviews and advice), you will also improve the site’s position on targeted queries and generate additional traffic to the site.
- You can insert a newsletter subscription form into the blog and thus “tie” the person to another way of communication.
- Previews of top articles often attract audiences on social networks.
- If the product range is updated very rarely, a blog will be a great opportunity to remind people that the business is alive.
Step 6. Install plugins
Can you skip this step? Yes, but we wouldn’t recommend it. For example, the easiest way to set up an online store is with the WooCommerce plugin. Similarly, Yoast SEO greatly simplifies working with a blog.
We have prepared a separate detailed guide (сюди засунути ссилку на наступну статтю) on working with WooCommerce.
Of course, you shouldn’t install all the plugins at once, because each of them will slow down your website. We have compiled a list of the most essential plugins that are supported by most new WordPress themes and explained the nuances of their installation. Details can be found at the link below.
Step 7. Optimize the site to increase its speed
If a page takes too long to load, your visitors will quickly move on to another site. The simplest and, it seems, the most effective way to solve performance issues is to configure browser caching.
What does this give us? Without caching mechanisms, each request to a page will trigger the execution of this code and use the same amount of server resources each time. Caching allows you to store the most requested pages in a so-called fast access storage (cache) in the form of pre-created static pages.
This allows you to deliver information from the site to visitors faster and more efficiently and reduce the load on the server (especially when there are a large number of visitors to the site).
To enable caching for your website, install and activate a caching plugin. There are several available, and we recommend LiteSpeed Cache. The settings you need to configure for optimal performance are described in detail here.
Tips to help you work with WordPress
1. Use hyphens in file names
When naming your files in WordPress, use hyphens instead of underscores. With underscores, Google will treat the file as one big word. This can hurt your SEO.
So use example.com/this-is-an-example, NOT example.com/this_is_an_example).
2. Use WordPress online support
If you get stuck, use WordPress online support. There is a whole list of forums in English on wordpress.com.
3. Use Alt text for images
When uploading images, people are often too lazy to write alt text (short descriptions of images). But it’s important to understand how many opportunities alt text offers:
- it increases accessibility for people with disabilities (many use programs that convert data into sound);
- it improves the thematic relevance of the page, since Google studies every page on the Internet to determine its subject matter. And if the “context” is hidden in images, it simply won’t be able to determine the theme of the site;
- raises the page in Google Images rankings – this can also generate excellent traffic;
- allows Google to better understand the subject matter of the page linked to the image.
4. Make regular backups
Backups are very helpful — in case of loss of access or technical difficulties, you will have everything you need to fully restore your content.
You can back up your website using special plugins, such as Snapshot Pro, or choose a host that will do it for you.
HostPro backs up all websites on virtual hosting services every night and provides archives saved over the last 30 days
5. Add custom permalinks
It’s better not to miss the opportunity to add permanent URLs that you plan to keep static for a certain period of time. This will help users navigate your site more easily.
6. Remove automatic plugins
When you install WordPress, the Hello Dolly and Akismet Anti-Spam plugins will already be in the “Plugins” section of the WordPress console. To avoid slowing down your site’s performance, it’s best to remove them immediately.
7. Use demo versions of themes
When choosing a theme, use demo versions before deciding to use them. Thanks to the preview, you can not only check how visually appealing the theme is, but also test its functionality.
8. Check adaptability
Always check how the mobile version of the site looks—whether the functionality is compromised and whether there are any design issues. Most modern themes are, of course, adaptive, but it doesn’t hurt to check anyway. You can do this using Google Mobile Friendly, mattkersley.com, or quirktools.com.
In conclusion
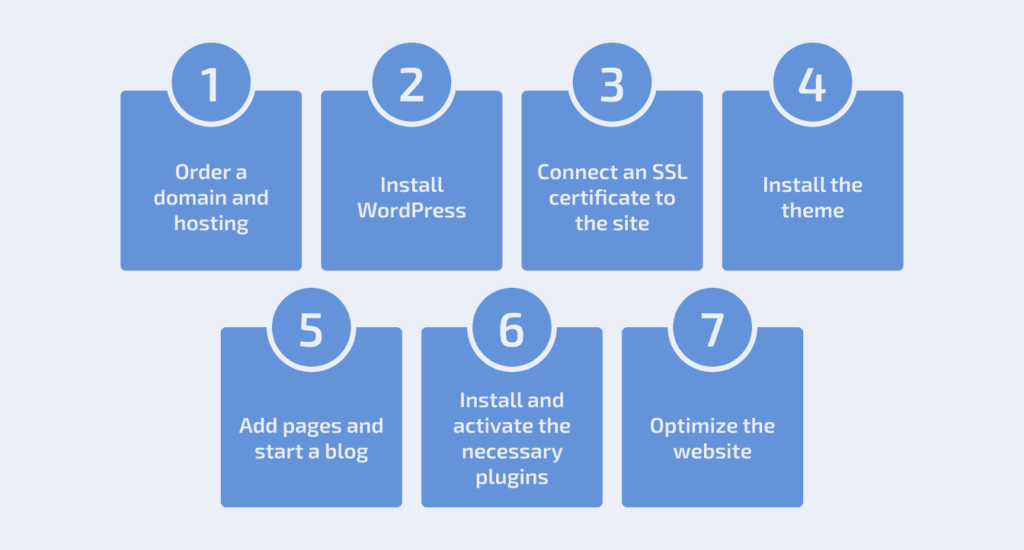
To summarize, to create a WordPress website from scratch, we need to:
- Order a domain and hosting
- Install WordPress
- Connect an SSL certificate to the website
- Install and configure a theme
- Add pages and start a blog
- Install and activate the necessary plugins
- Optimize the website
If it is hard for you to fully understand text information, you are not alone. Especially for these situations we prepared a video guide “how to install WordPress” to make your life a thousand times easier.
We hope you find this article useful, and remember — it is entirely possible to build a website on your own. Just in case, we are here to help. We are happy to assist you 24/7 with choosing the right hosting plan and registering domains.