


The message “Localhost refused the connection” indicates that the server was unable to establish an internal connection with the required service that processes user requests.
There are two main errors that cause the browser to display the “Localhost refused the connection” message:
- ERR_CONNECTION_REFUSED – the server rejected the connection request.
- ERR_CONNECTION_TIMEOUT – the server did not respond to the request within the specified time.
This may be due to issues with the web server, database, or another component responsible for the website’s operation. In this article, we’ll examine the most common causes of this issue and how to resolve them.
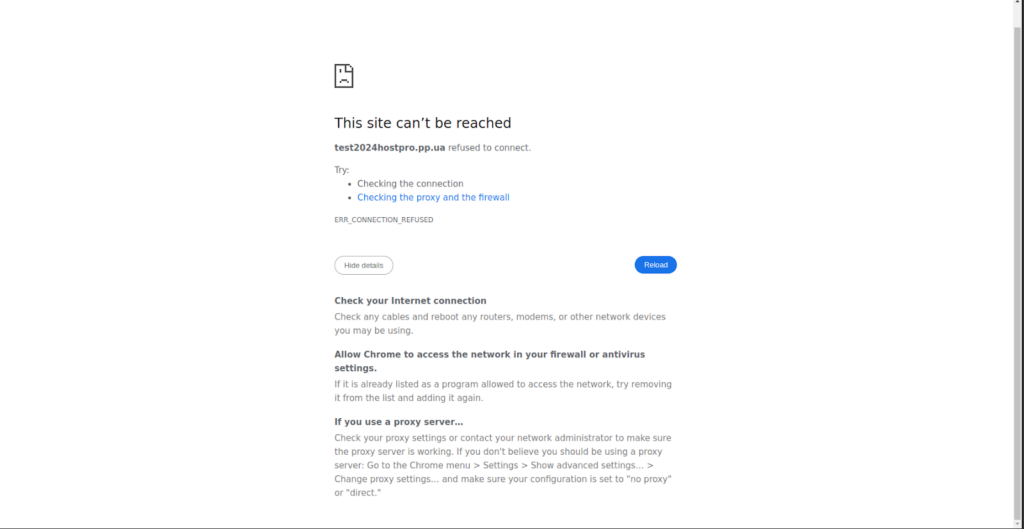
Common Causes of the “Localhost Rejected Connection” Error and Their Solutions
The “Localhost Rejected Connection” error means that one of the website’s services is attempting to connect to another local service via the address 127.0.0.1 or localhost, but the connection fails. This can result in the website being partially or completely inaccessible, as well as malfunctions in scripts or APIs.
This can cause:
- errors when opening pages;
- script malfunctions;
- interaction issues between website components.
Below, we’ll look at common causes and steps to resolve this error.
Port Conflicts and Local Services
When a browser displays the error “Localhost rejected the connection,” one of the most common causes is a lack of response from the local web server. This is often due to the fact that the relevant service (such as Apache, Nginx, or another server that should be handling the request) is not running or is not listening on the expected port.
By default, the local web server runs on port 80 (for HTTP) or 443 (for HTTPS). In development environments, other ports are often used as well: 3000, 8000, 8080, and so on. If a request is sent to one of these ports but no service is handling it, or if the port is already occupied by another process, the browser will not receive a response to the request, resulting in a connection refusal error.
Solution:
To determine whether a specific port on your computer is in use, as well as which process is using it, you need to run special commands in the appropriate operating system interface. This interface is called the command line or terminal.
In Windows, the Command Prompt is used for this purpose. There are several ways to open it. The simplest is to press the Win + R keys, type cmd in the “Run” window, and press Enter. You can also find it through the Start menu by typing “Command Prompt” or “cmd” in the search bar.
It is recommended to run the Command Prompt as an administrator so that you have all the necessary permissions to execute system commands. To do this, right-click on “Command Prompt” in the search results and select “Run as administrator.”
In this window, you can run the following command:
# netstat -aon | findstr :80This command will show whether port 80 is being listened to and display the process ID (PID) of the process using it. If the port is in use, you’ll find out which process is using it. Next, you can enter:
# tasklist | findstr [PID]where [PID] is the process ID you obtained in the previous step. This command lets you find the name of the program occupying the port.
For greater convenience, you can use the TCPView graphical utility from Microsoft Sysinternals. It provides a visual interface for viewing open ports and processes in real time.
In Linux, ports and processes are checked via the terminal—a text-based command-line interface. You can open it through the application menu or using a keyboard shortcut (for example, Ctrl + Alt + T).
To identify which processes are listening on a specific port (for example, 80), you can use the command:
# lsof -i :80or a more versatile command:
# ss -tulpn | grep :80Another popular option is the command:
# netstat -ntlup | grep :80This command displays information about ports listening on TCP/UDP, including the processes and their PIDs.
If you need to free up a port, you can terminate the corresponding process using the following command:
# kill -9 [PID]where [PID] is the process ID of the process you want to terminate.
Important recommendations! Always exercise caution when terminating processes to avoid interrupting critical system services. After a reboot or automatic restart, some services may reoccupy the same port, so to fully resolve the conflict, it is recommended to make changes to the configuration files of the relevant programs.
Server Malfunction
The service responsible for handling requests (e.g., Apache, Nginx, MySQL, PHP-FPM, or another local web component) is not running or is malfunctioning. In this case, an attempt to connect to localhost (for example, 127.0.0.1:80 for a web server or 127.0.0.1:3306 for MySQL) will fail.
This can occur if:
- the service was stopped manually or due to a system error;
- a configuration error occurred during startup;
- the process crashed due to a lack of resources or overload.
As a result, other parts of the site that rely on this service cannot establish a connection, which causes the “Localhost rejected the connection” error.
Solution:
First, you need to determine which service is responsible for handling local connections. This could be a web server (Apache, Nginx, Litespeed), an interpreter (e.g., PHP-FPM), a database (MySQL, PostgreSQL), or any other local component. If it is inactive, requests from localhost cannot be processed, and the system will return an error indicating that the connection was rejected.
//LINUX
To check the status of services on Linux, use the following command:
# systemctl status apache2Or substitute the name of another service, for example:
# systemctl status httpd – another command to check Apache

# systemctl status nginx

# systemctl status mysql

# systemctl status php8.1-fpm
Please note! If the response shows that a service has a status of “inactive,” “dead,” “failed,” or is not running at all, that is the source of the problem.
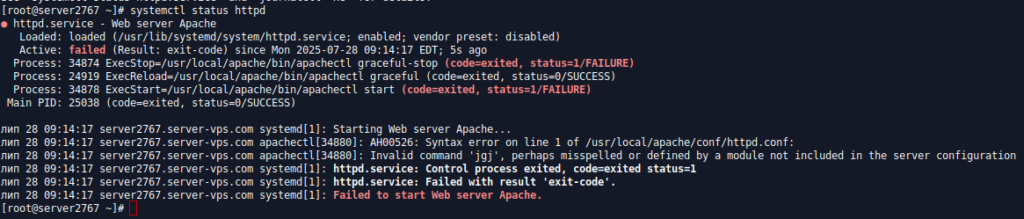
To get it running again, simply try starting it manually:
# systemctl start apache2After starting it, check the status again to make sure the output shows “active (running)” and that no errors are listed.
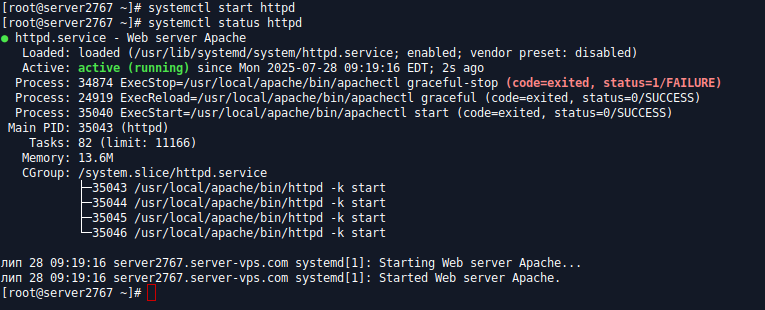
If the service fails to start (for example, it terminates immediately or displays an error), you’ll need to review the system logs. They’ll indicate the exact cause of the failure. Most often, this is due to an incorrect configuration, a port conflict, or a lack of resources:
# journalctl -xeOr review the log files for a specific service, for example:
# less /usr/local/apache/logs/error_log# less /var/log/httpd/error.logPlease note! The paths to log files may vary depending on the operating system, Linux distribution, service installation method (via a package manager, compilation from source, or a control panel), as well as the specific version.
The most common paths to Apache error logs:
/usr/local/apache/logs/error_log/usr/local/apache/error_log/var/log/httpd/error_logThe most common paths to NGINX logs (error logs):
/var/log/nginx/error.logThe most common paths to MySQL / MariaDB logs:
The error log can be located using the following command:
# mysqladmin var | grep log_errorBy default, it may be missing or located in:
/var/log/mysql/error.log/var/log/mysqld.logIf the logs are not present at the specified path, use the `find` command or check the relevant settings in the configuration files (for example, `ErrorLog` for Apache, `log_error` for MySQL).
# find / -name “error.log”If changes have been made to the configuration files (e.g., httpd.conf, my.cnf, nginx.conf), you should check them for syntax errors before restarting:
# apachectl configtest# nginx -t# mysqld --validate-configChecking the Apache Configuration
Additionally, let’s take a separate look at verifying the Apache configuration. To ensure that Apache’s configuration files do not contain syntax errors, it is recommended to run a configuration test before restarting the service.
Standard command (if Apache is installed system-wide):
# httpd -tOr
# apache2ctl configtestAlternatively:
# apachectl configtestA successful response should look like this:
Syntax OK
If you’re using a custom Apache installation (for example, with the CWP control panel):
In the Control Web Panel (CWP), Apache is typically installed in a separate directory—/usr/local/apache. In this case, use:
# /usr/local/apache/bin/httpd -tor
# /usr/local/apache/bin/apachectl configtestThese commands check the web server’s configuration independently of the system’s httpd.
If the service fails to start due to insufficient memory or an exceeded process limit, check the server’s load:
# free -m# topThen free up resources or optimize the autostart settings for other services.
Also, make sure the service is configured to start automatically at system boot to prevent the error from recurring after a server restart:
# systemctl enable apache2//Windows
If the system is running on Windows, the principle remains the same: the “Localhost rejected the connection” error occurs when the required local service is not running or has stopped due to an error.
To ensure that the necessary web server or database services are running, use the standard Windows Services Manager:
Press Win + R, type services.msc, and press Enter.
In the list, locate the services that correspond to your environment.
Please note! Service names may vary depending on the software installed.
If you’re using local development packages, such as WAMP, XAMPP, or OpenServer, the services may have different names, for example:
- wampapache64 (Apache in WAMP);
- xamppapache (Apache in XAMPP);
- nginx (if Nginx is installed).
If you’re unsure of the service name, check your environment’s documentation or search for the service using the filter in the service manager.
Once you’ve found the service you need in the list, check its status, which is displayed in the corresponding column. If the status next to the service is “Running,” it means the service is active and ready to handle connections. If the status is blank or marked as “Stopped,” this indicates that the service is currently not running, and this may be the cause of the “Localhost rejected the connection” error.
To start the service, right-click on it and select “Start.” This will launch the necessary web server, database, or other service responsible for local connections. If the service is already running but you suspect it’s not working properly, you can restart it. To do this, right-click the service and select “Restart.” Restarting will refresh the process and help resolve temporary glitches or freezes.
It’s also important to check the service’s startup type. To ensure that the required service starts automatically after the computer restarts, open the service’s properties and make sure that the “Startup type” field is set to “Automatic.” If a different value is selected, change it to avoid recurring issues with service availability.
A firewall is blocking the connection
Another common reason for being unable to connect to localhost may be that the port or the process itself is being blocked by the system firewall. On Windows, this could be the built-in “Windows Defender Firewall” or third-party antivirus software with its own firewall. If a service, such as Apache or MySQL, uses a port that is restricted or blocked for incoming or outgoing connections, an attempt to access localhost will result in an error. A similar situation is possible on Linux systems—iptables, firewalld, or nftables may have active rules restricting access to certain ports, such as 80, 443, or 3306.
Solution:
To verify that you have correctly identified the problem, open “Windows Firewall with Advanced Security” on Windows and review the rules for incoming and outgoing traffic—check whether connections are allowed for the desired program or port.
On Linux systems, local connections may also be blocked at the system firewall level. The most common tools for managing rules are iptables, firewalld, and nftables. To check active rules, you can use one of the following commands:
# iptables -L -n# firewall-cmd --list-all# nft list rulesetIf the output of these commands shows DROP or REJECT rules for the desired port (for example, 80 or 3306), this may be the reason for the connection failure. In this case, you should modify or remove the corresponding rule.
Servers with control panels or specific configurations may have additional security measures installed, such as CSF (ConfigServer Security & Firewall). CSF integrates with iptables and adds its own rules—you can view them using:
# csf -lIt’s also possible that access is being blocked by a web application firewall, such as ModSecurity. In this case, suspicious or high-volume local requests may be flagged as a potential attack and automatically blocked. To check, review the ModSecurity logs:
/usr/local/apache/logs/modsec_audit.log/var/log/httpd/modsec_audit.logor other paths, depending on the distribution and configuration.
In general, it’s a good idea to check all filtering levels—from basic system firewalls to third-party security solutions that might be blocking necessary ports or IP addresses without the administrator’s knowledge.
Please note! For temporary testing, you can also completely disable the firewall and check if the problem goes away. However, it’s important to remember: disabling the firewall is only a diagnostic step, and under no circumstances should you leave the system without active protection after testing.
Temporarily Disabling the Firewall in Linux
In Linux, the method for disabling the firewall depends on which firewall is being used. Most commonly, these are firewalld, iptables, or nftables. If firewalld is active on the server, it can be stopped via systemd—after which all blocking rules will be suspended until the service is restarted. In the case of iptables, temporarily disabling it usually involves resetting the rule tables to zero, which also allows you to verify whether the rules are the source of the problem. If nftables is being used, simply unloading the active ruleset is sufficient.
Keep in mind that after a system reboot or restart of the firewall service, the rules may be reactivated, so this is a temporary solution intended solely for testing.
Certain firewall solutions, such as CSF (ConfigServer Security & Firewall) and ModSecurity, can also block local connections; therefore, for a thorough diagnosis, you should disable them separately or check their impact on traffic.
CSF (ConfigServer Security & Firewall) is a popular firewall for Linux servers that runs on top of iptables. To temporarily disable CSF:
# csf -xThis command completely stops CSF and removes all its rules from iptables. If you want to re-enable CSF later:
# csf -eBefore disabling it, it’s advisable to ensure you have direct access to the server, because if access is mistakenly blocked after re-enabling it, it may be impossible to restore the connection remotely.
ModSecurity is a firewall that integrates with a web server (Apache, Nginx, or LiteSpeed). It can block requests—even if the network ports are open—if it deems them potentially malicious. To temporarily disable ModSecurity in Apache:
At the global configuration level (httpd.conf or via the control panel), change:
# SecRuleEngine OffThen restart Apache:
# systemctl restart httpdIf you’re using cPanel, it’s easier to disable ModSecurity via WHM: “ModSecurity Configuration” → “Disable ModSecurity” for a specific domain or globally.
To verify whether ModSecurity is blocking requests, you can check the logs:
/usr/local/apache/logs/modsec_audit.log/var/log/httpd/modsec_audit.logThese logs will list the blocked requests, the reason for the block, and the corresponding Rule ID.
Temporarily Disabling the Firewall in Windows
In Windows, you can disable the firewall via the graphical interface or from the command line if you have administrative privileges. The standard method is through “Windows Firewall with Advanced Security,” where you can disable profiles for domains as well as for private or public networks.
There are also PowerShell commands that allow you to instantly disable all firewall policies. This lets you verify whether the security system is blocking the connection without having to search for a specific rule.
⚠️ Note: After testing, be sure to re-enable the firewall so as not to leave the system vulnerable to external attacks. This is only a diagnostic step to pinpoint the connection issue.
Incorrect configuration of the hosts file
One reason for a connection failure may be an incorrect configuration of the hosts file. The operating system uses this file to map domain names to IP addresses locally before querying DNS. If the entries in it are incorrect—for example, if `localhost` does not point to `127.0.0.1`, or if a specific domain is mapped to the wrong address—this can lead to errors when connecting to a local server or database.
Solution:
Check the contents of the hosts file and ensure there are no incorrect entries.
On Linux, the hosts file is located at:
/etc/hostsA typical correct configuration:
127.0.0.1 localhost127.0.1.1 your-hostnameIn Windows, the file is located here:
C:\Windows\System32\drivers\etc\hostsThe correct configuration looks something like this:
127.0.0.1 localhost127.0.0.1 mysite.localPlease note! In Windows, the hosts file has no file extension. To edit it, you must run a text editor (such as Notepad) with administrator privileges; otherwise, you won’t be able to save your changes.
You should also check for duplicates or extra spaces/characters in the lines, as this can affect how the entries are processed. If you’re testing a website locally, make sure the domain you’re using in your browser or scripts is listed in the hosts file and points to 127.0.0.1.
After making changes to the hosts file, the system may continue to use cached DNS records, so it’s recommended to clear the DNS cache to ensure the updated records take effect.
DNS Cache and the ERR_CONNECTION_REFUSED Error on localhost
The ERR_CONNECTION_REFUSED error means that the browser attempted to connect to the server at 127.0.0.1 or localhost, but the connection was refused. This usually indicates that no server is running on the specified port, or that the connection is being blocked by local settings.
It’s worth noting that the IP address 127.0.0.1 is a local loopback address that does not require DNS resolution. However, when using the name “localhost,” the system must recognize it correctly, which usually happens via the hosts file. If this file has been modified or the DNS cache contains outdated data, resolution may not work properly. As a result, the browser may fail to find the correct IP address or may access it incorrectly.
Solution:
To rule out issues related to the DNS cache or incorrect localhost resolution, it is recommended that you clear the DNS cache. This will help update the mappings between domain names and IP addresses on your system.
In Windows, this issue is resolved by flushing the DNS cache. This completely clears cached entries that may have caused conflicts when accessing the local host. The command used for this in the system is:
# ipconfig /flushdnsYou must run this command in the command prompt with administrator privileges so that the system can apply the necessary changes.
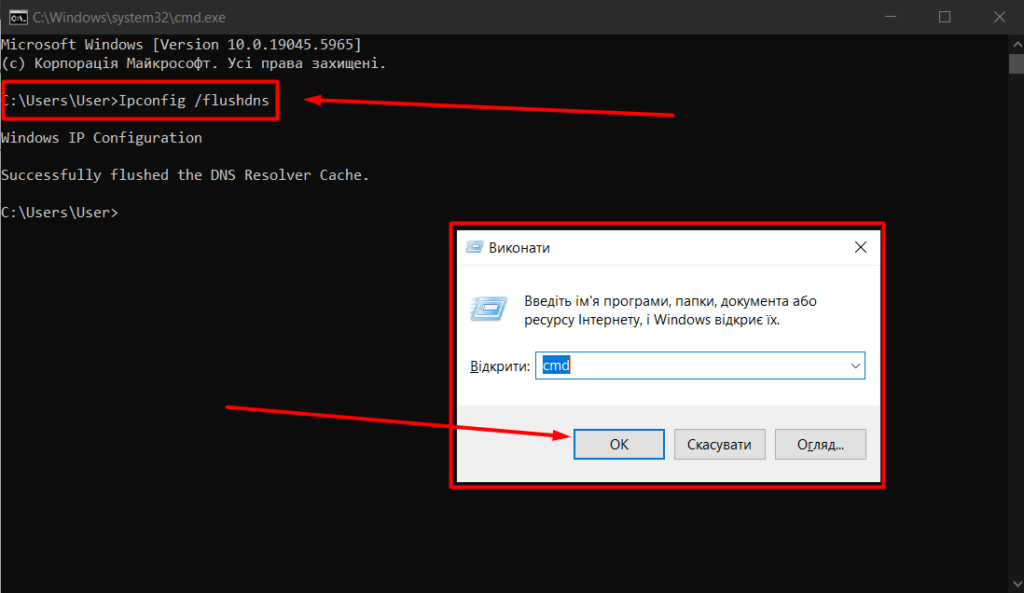
On Linux, the approach depends on which DNS caching service is being used—for example, systemd-resolved, dnsmasq, nscd, or bind. To clear the cache, you usually need to restart the corresponding service or run a command that flushes the DNS tables.
In addition to the operating system, the DNS cache can also be stored in browsers. Some browsers, such as Chrome, Edge, or Firefox, have built-in interfaces for clearing this cache. In certain cases, cached DNS records in the browser can prevent a local website or web interface accessible via 127.0.0.1 from loading correctly.
To clear the DNS cache directly in the browser, enter one of the following addresses into the address bar:
- Google Chrome: chrome://net-internals/#dns
- Microsoft Edge: edge://net-internals/#dns
- Firefox: about:networking#dns
- Opera: opera://net-internals/#dns
Once you’ve navigated to the corresponding page, click the button to clear the DNS cache.
Clearing the DNS cache is a simple yet effective step that allows you to quickly rule out one of the possible causes of a connection failure. If the issue persists after clearing the cache, you should investigate other levels of network interaction, such as the configuration of your local web server, firewalls, or the hosts file.
Browser-Specific Issues
In some cases, the connection to a local or remote server is blocked at the browser level. One of the most common causes may be corrupted or outdated cached data, as well as cookies containing expired access tokens or incorrect session information. Clearing the cache and cookies allows you to eliminate this factor and rule it out as a potential cause.
Another common cause may be browser extensions—especially those that deal with networking, security, or proxy servers. For example, ad blockers, VPN extensions, or even developer tools can affect a page’s network interactions. To troubleshoot, try temporarily disabling all extensions, especially if the issue occurs in only one browser.
It’s also worth noting that some browsers (such as Chrome) have their own security policies regarding local access, mixed content, or self-connections (localhost to localhost). In some cases, this can cause connection errors, even if the server-side is functioning correctly. Therefore, it’s important to test the site in different browsers to rule out the influence of a specific browser.
Automatic Redirection from HTTP to HTTPS in the Browser
Modern browsers, particularly Chrome and Firefox, often automatically redirect HTTP requests to HTTPS. In local environments, this can result in a “Localhost rejected the connection” error if the server is not configured to accept HTTPS requests.
In such cases, it’s a good idea to try opening http://localhost in a browser that doesn’t enforce HSTS policies or has HTTPS-only mode disabled. For example, in Chrome, you can manually remove the localhost entry from the HSTS policies, and in Firefox, you can disable the forced HTTPS policy in the privacy settings. If the connection is established after that, the problem is likely related to the browser’s security policy rather than the server or DNS configuration.
Removing HSTS Policies in Chrome
Google Chrome uses HSTS (HTTP Strict Transport Security), which automatically redirects HTTP requests to HTTPS. This can cause an error when accessing localhost if the local server is not configured to handle HTTPS requests. To resolve this issue, you must manually remove the localhost entry from the dynamic HSTS policy.
Chrome provides a special policy management tool for this purpose, available at:
chrome://net-internals/#hstsIn the “Domain Security Policy” section, enter “localhost” in the field to remove the domain and apply the changes.
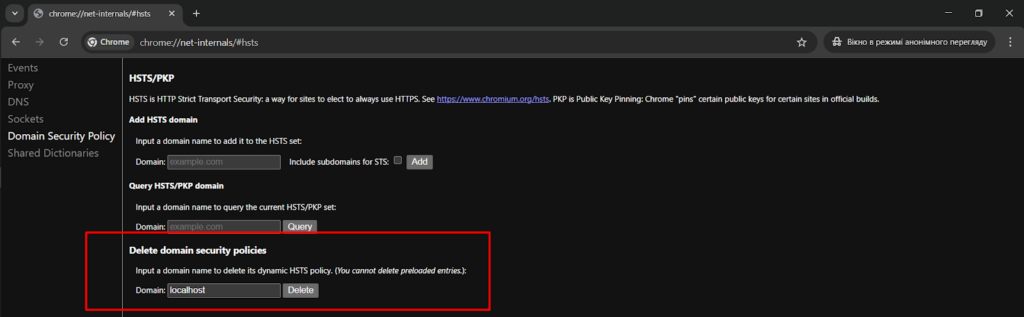
After that, you’ll need to restart the browser for the changes to take effect. This will prevent http://localhost from being automatically redirected to https://localhost and help you verify whether the issue was indeed related to Chrome’s security policy.
Disabling HTTPS-only mode in Firefox
Firefox may also have a mode enabled that forces the use of HTTPS connections even for local resources, including localhost. This behavior can cause an error when attempting to open a local site that does not support SSL.
To check whether this mode is the cause of the error, you can temporarily disable it. In the browser settings, go to the “Privacy & Security” section, find the “HTTPS-only mode” option, and select “Do not enable HTTPS-only mode.”
After making these changes, it is recommended that you restart your browser for the changes to take effect. This will allow you to load pages via a standard HTTP connection and determine whether the issue is specifically related to the forced use of HTTPS.
Conclusion
The “Localhost rejected the connection” error can occur for various reasons—ranging from malfunctioning services and firewall blocks to incorrect settings in the hosts file or port conflicts. It’s important to systematically check each potential factor, starting with diagnosing server and service activity, monitoring firewall access, and verifying the accuracy of local DNS records, and ending with checking the browser.
Using basic commands to check open ports, analyze logs, clear the DNS cache, and properly configure the hosts file will help you quickly pinpoint the problem and resolve it. It’s also important to consider the specific characteristics of different operating systems to correctly apply diagnostic and troubleshooting methods.
By following the recommendations described in this article, even users with basic knowledge will be able to successfully resolve the issue of being unable to connect to localhost and restore stable operation of local web services.